⚙️ Freight Settings
The "Settings" area is where you connect your carrier accounts, tidy up how services are named, look after your data, and set up printing. This page will guide you through each of those, plus importing historical consignments from another platform.
Platform freight is part of the Complete plan. Open "Settings" from the sidebar of the freight app at freight.equos.one. Along the top sit the general controls — auto-refresh, the print station, and (in the desktop app) local printing — and below them a "Configuration" grid of tiles for each area covered here.
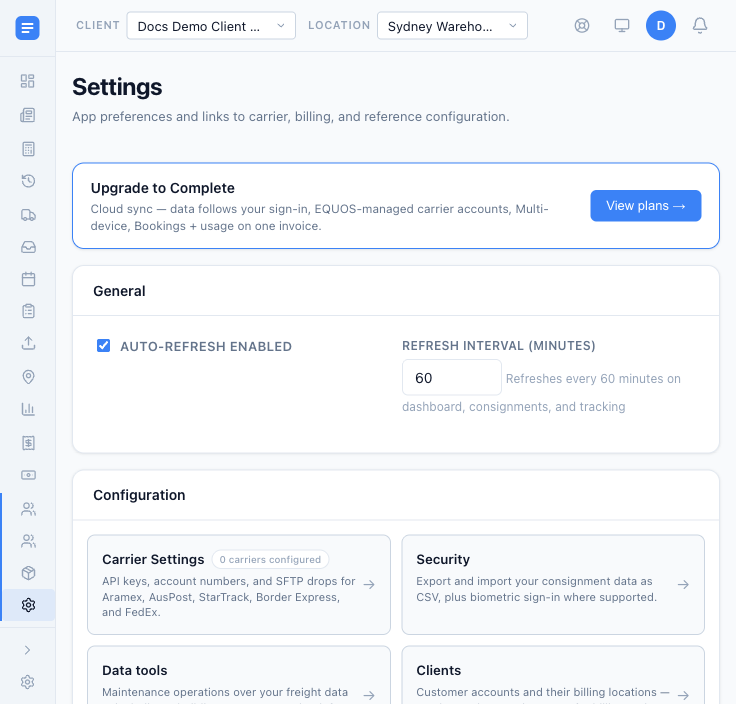 The Settings home, with a tile for each area you can configure.
Connect your carriers first, then map your services so reports can compare like with like. Set up a print station once and every screen can print to it. The Data tools and Import areas are for tidying and bringing in history — simply reach for them when the numbers look stale rather than every day.
General
Under the "General" card you control how often the app refreshes on its own.
- Auto-refresh enabled — the master switch for background refreshing.
- Refresh interval (minutes) — how often EQUOS quietly re-pulls the dashboard, consignments, and tracking screens so a booking made elsewhere shows up without you reloading. Set it anywhere from 1 to 1440 minutes.
This helps a busy team keep a shared view current without each person reloading by hand.
Carriers
The "Carrier Settings" area lists every carrier as a tile — Aramex, AusPost, StarTrack, Border Express, and FedEx — with its current state: "Configured", "Incomplete", or "Not Configured". A carrier is the delivery company that actually moves your freight.
- Simply click a carrier tile to enter its credentials — API keys, account numbers, and any SFTP details the carrier needs.
- A tile reads "Incomplete" until every required field is filled, then flips to "Configured". This ensures you can see at a glance which carriers are ready to quote and book.
Credentials are stored securely on EQUOS servers, and changes take effect immediately.
Services
Carriers name their services in their own way, and the same service can arrive spelled differently on different imports. The "Services" area is where you fold all of those into one tidy catalogue, so quoting and reporting stay consistent. A service is the speed or product a carrier offers — overnight, road express, and so on.
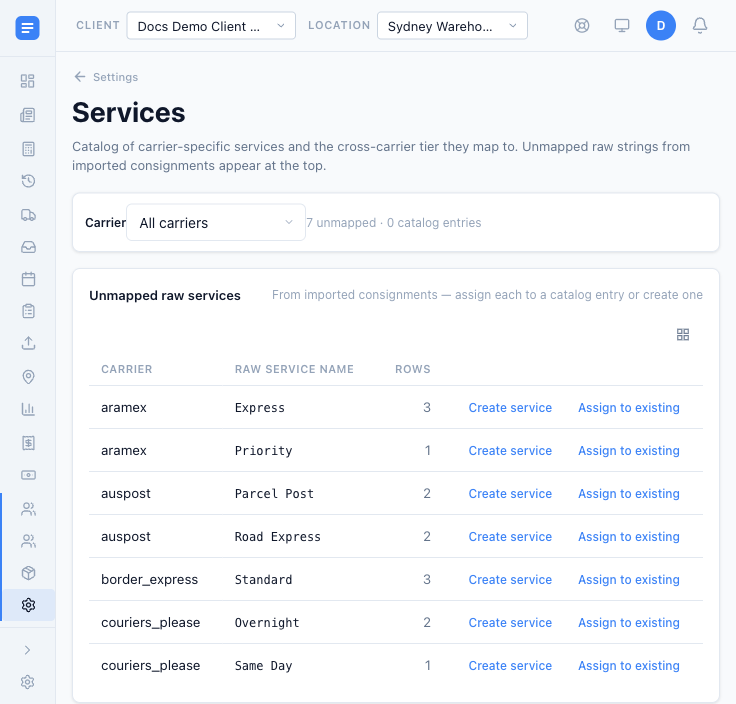 The "Unmapped raw services" table, ready to be folded into your catalogue.
Mapping unmapped services
At the top, the "Unmapped raw services" table lists service names seen on your consignments that EQUOS does not yet recognise, with a row count so you can see which matter most. For each one you have two choices:
- Create service — add it to the catalogue as a new entry.
- Assign to existing — fold it in as an alias of a catalogue entry you already have, so both spellings count as the same service.
Use the "Carrier" filter to work through one carrier at a time. This ensures the same service booked under three different names still reports as one.
The service catalogue
Each catalogue entry carries a few fields, set when you create or edit it:
- Canonical name — the tidy name you want to see everywhere (for example, "Parcel Post").
- Tier — the cross-carrier grouping. There are four: Same-Day, Express, Standard and Economy. This is the like-with-like key: a "Tier" comparison in Freight Reports lines an Express service from one carrier up against Express from another, so you compare speeds rather than carrier-specific names.
- Signature variant — mark a service that should be treated as a distinct product (for example, a signature-on-delivery version).
- Aliases — every raw name that folds into this entry. Remove one with the "×" on its chip.
- Active — whether the service can be picked for new bookings. Turn it off to retire a service without losing its history.
Backfilling existing consignments
When you map a service that already appears on past consignments, those older rows still hold the raw name and no tier. A "Backfill N consignments" button appears in the Services toolbar whenever there are such rows — press it once and EQUOS applies your new mappings back across all of them at once. This ensures your reports group consistently rather than splitting the same service across several names. It is safe to run again whenever new mappings pile up.
Security
The "Security" area is where you move consignment data in and out, and set up biometric sign-in.
- Under "Export consignments", pick a client and press "Export CSV" to download all of that client's consignments in the standard import schema.
- Under "Import consignments", pick the client to load into, choose how to handle a consignment that already exists — "Skip existing" or "Replace existing" — then use "Choose CSV & import". Every row is attached to the client you selected.
- On a Mac, you can turn on "Require Touch ID on launch" so the freight app asks for Touch ID each time it opens. Sign in once with your email and password to enable it, and use "Forget Touch ID credentials" to clear it from that device.
For bringing in a whole history from another platform, use the guided Import wizard below rather than this simpler client-scoped import.
Data tools
The "Data tools" area holds maintenance jobs you reach for when the numbers look stale rather than every day. Both are safe to re-run, and both let you preview before anything changes.
- Rebuild consignment index — refreshes the projection behind the consignments list. Press "Refresh status" to see how many consignments are live and whether anything is waiting, then "Rebuild current tenant" to re-queue them. Run it if a consignment you know is booked is not showing where you expect.
- Rebuild contacts — press "Scan history" and EQUOS reads the senders and receivers across your whole consignment history, dedupes them, and shows how many are new. Press "Add N new contacts" to fold those into your address book. Your existing contacts are never touched. Run it if your address book looks behind what you have been shipping.
Print Station
The "Print Station" sends labels and manifest PDFs straight to a desktop print companion instead of downloading a PDF each time.
- Enter the workstation's user ID (shown in the print-companion app), press "Validate" to confirm EQUOS can reach it, then "Save".
- Set Default copies for how many of each label to print.
- Once saved, a "Send to Print Station" action appears on label and manifest PDFs across the app, and "Clear" removes the link.
This helps your team print a label the moment a consignment is booked, without walking a file between screens.
Local Printing (desktop app only)
If you run the freight app as the desktop application, an extra "Local Printing" card lets it print straight from that computer with no dialog and no print-station round trip. This refers to the desktop edition of the platform freight app — it is a different product from equosFreight, the standalone tool found in the Annex.
- Press "Refresh printers" to list the printers this machine can see.
- For each document type — Freight labels and Reports — pick a printer and set the page size in millimetres, then "Save".
- Use "Test print" to send a test page and confirm the size before you rely on it.
When a local printer is set, the "Send to Print Station" action prints here instead.
Other configuration tiles
A few tiles in the Configuration grid open areas covered elsewhere in this guide:
- Clients — your customer accounts and their billing locations, used to assign consignments for billing and on-charging.
- Client portal access — map each freight client to a business unit (the tenant that owns a set of data in EQUOS) so their orders appear in that business's client portal, and re-sync orders. This is covered with the rest of that flow on the Order Sync page.
- Insurance — where transit-cover defaults live. See Transit Insurance for how cover works in the booking flow.
- Subscription — your EQUOS subscription and payment method. See Freight Billing for how that differs from the client statements you raise.
- About — app version, build info, and links to support.
Importing historical consignments
When you move to EQUOS from another platform, the "Import" area brings your past consignments across in bulk. The rows land as external consignment records — no carrier is contacted and nothing is re-booked — so it is safe to load a whole history at once. It runs as a three-step wizard much like reconciling.
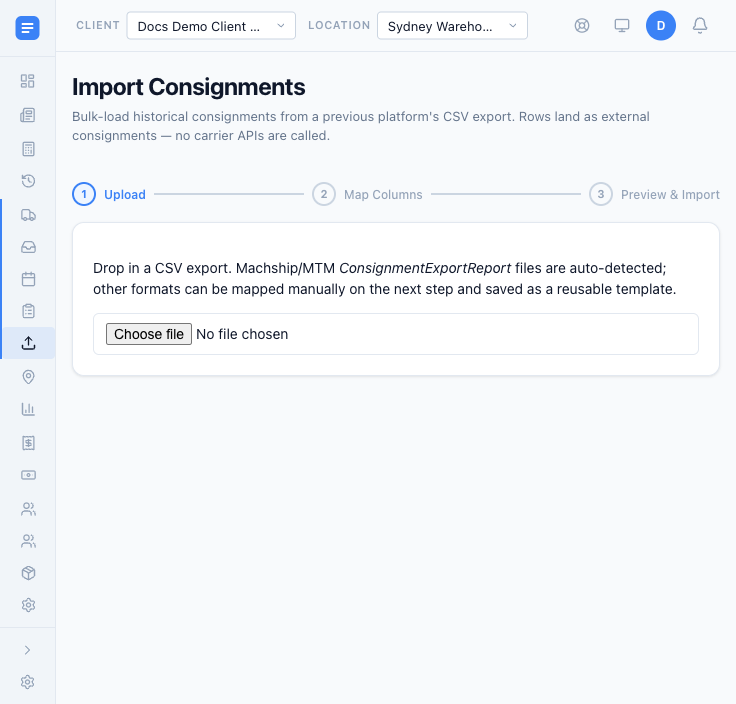 Step one of the import wizard — drop in the CSV your previous platform exported.
- Upload — drop in the CSV your previous platform exported. Common export layouts (such as Machship/MTM reports) are recognised and mapped for you; other layouts you map by hand on the next step, and can save as a reusable template.
- Map Columns — point any unmapped columns at the right fields, and choose how to treat a consignment that already exists: "Skip duplicates" or "Replace duplicates". Duplicates are matched on the carrier consignment ID, so if that column is left unmapped, "Replace" is switched off and EQUOS steers you back to "Skip" — this helps prevent one row overwriting an unrelated one.
- Preview & Import — before committing, EQUOS shows what it will do: how many consignments, and how many companies will become clients. Two opt-out toggles, "Create clients" and "Create contacts", let you decide whether new clients and address-book contacts are created from the file, or whether it uses only what you already have. The import then runs in batches with a progress bar.
After importing, use "Mark all delivered" to attach a Delivered status to every consignment brought in under that source, so your old shipments do not sit looking as though they are still moving.
"Mark all delivered" covers every consignment under that source name — including any from earlier imports under the same name, not just the batch you just loaded. It is safe to re-run, but check the source name is the one you mean before you confirm.
What's next
- Carriers connected and services tidied? Head to Quotes & Booking to book your first consignment.
- Want to compare carriers like with like? See Freight Reports, which uses the tiers you set here.
- Bringing orders across from the main platform? See Order Sync.